FREQUENTLY ASKED QUESTIONS
FREQUENTLY ASKED QUESTIONS
GENERAL
TA technical support is available by phone, email, or a live chat function on our web portal:
- 443.491.8241
- support@tissue-analytics.com
- To contact TA technical support using the chat function, go to the web portal at https://portal.tissue-analytics.com and click the chat icon in the bottom right of the screen. To discuss a specific patient, wound, or evaluation, navigate to the relevant page in the portal and then click the chat icon to open the chat window. This will automatically provide the system administrator with the associated information.
Navigation Mobile App
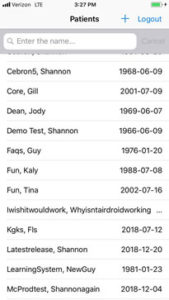
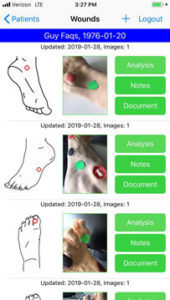
Log in to the mobile application. A list of patients will appear. Select the patient whose wounds you want to inspect. On the next screen, identify the wound that you want to inspect. If you want to see the past images, click on the image thumbnail and you will be able to scroll through all of the images.


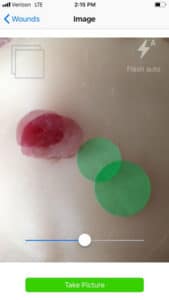
Log into the mobile app and select the patient from the list of patients. From the list of wounds click on the Document button beside the wound you wish to photograph. From the photo screen, select the overlapping boxes icon in the top right corner. This will overlay the most recent photograph taken of this wound. The sliding bar at the bottom of the screen can adjust the magnification of the overlay. Take the photo when the dot and would are closest to the overlaid image.

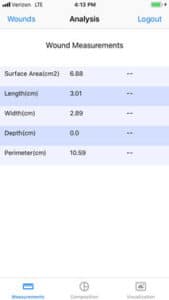
Log in to the mobile app and select the patient from the list of patients. From the list of wounds select the Analysis button located next to the thumbnail of the wound you wish to inspect. Click on Measurements, Composition, or Visualization at the bottom of the screen to view the associated analysis.

Also, after you "Submit" a photo and navigate through the Observations and Forumularies screens, you will reach the analysis page. After approximately one minute, the wound analysis, including measurements and tissue composition, will appear on the screen. Please use the refresh arrow if you do not yet see the analysis on this page.
Navigation Web Portal
Yes. Log in to the web portal using the same username and password you use for the mobile app. Locate the patient whose wound(s) you wish to document and click on their name. Select the wound and date of evaluation that you wish to document. Under the evaluation you will find the options for Observations and Formularies. You will only be able to make changes if the evaluation has not been previously signed and locked. Use a drop down list to select options for each Observation. Click No Formularies Recorded to bring up the menu to add Formularies.
Login to the web portal and locate the patient and the desired wound from the wound list for the patient. Click on the image in the film strip that you want to compare to another. To the right of the image, under the red Sign and Lock button there is a date (△MM/DD/YEAR). Click on this date to compare the image to an image of this wound by selecting the date to compare from the drop down.
To take a new photo of an already-documented wound, click on the patient name in the mobile app. The list of wounds for that patient will display. To take a new photo, click on Document beside the wound you wish to photograph. You will now be able to take a photo of this wound and it will automatically be added to the series of photos for that wound.
Login to the web portal and locate the patient and the desired wound from the wound list for the patient. All the photos of that wound will display. Click on the image that you wish to document. Under the evaluation there is a Notes field. Enter your notes in the Notes field and click Submit Note.
DATA ENTRY
It is possible that the patient was marked as discharged. To check if this was the case, log in to the web portal and click the All Patients tab. Enter the patient name or M.R.N. in the search box and then check the Include discharged patients box to the right of the screen. If the patient still does not appear please contact TA technical support.
Currently this must be completed by TA system administrators. Please contact TA technical support using the chat function in the web portal. Navigate to the image that you would like deleted and click the chat icon to open the chat window. This will automatically provide the system administrator with the information needed to delete the image.
Currently this must be completed by TA system administrators. Please contact TA technical support using the chat function in the web portal.
ANALYSIS AND MEASUREMENTS
The analysis can take up to 2 minutes to complete. If you have not seen the analysis come through and several minutes have passed, please contact TA tech support.
The mobile app uses imaging technology to correct for unsatisfactory lighting conditions and produce clear images of the wounds. However if your mobile device does not have a flash or if the flash is occluded (blocked), the app's lighting correction will not be able to overcome these issues. Please check if your smartphone or tablet case is blocking the flash. Additionally, we always recommend that the region you wish to photograph is well lit.
You may contact TA tech support to have the image sent for reanalysis, or you can retrace the wound boundary from the web portal. Navigate to the image that you would like to retrace and click the wrench tool in the top right corner of the image. Follow the prompts on the following page to make Analysis Corrections and click Submit when you are satisfied with the new boundary. The measurements will update shortly after you've completed the retrace.
The core of TA's technology is the ability to measure a true surface area of the wound, which is different from length multiplied by width. TA has published results showing that this method is significantly more accurate than the length times width estimation for area. However, if you are comparing your length and width measurements to the TA length and width measurements, and they still disagree, there are a few things that you can verify:
- The wound margins may be incorrect : If the wound margins are incorrect, you can retrace the wound margins.
- The camera is not oriented correctly and the measurements are in "Compass" mode : TA defines compass mode as measuring the wound from head-to-toe for length and side-to-side for width. This is the most popular method. However, the TA software assumes that the top of the camera screen is pointing towards the head of the patient. If this is not the case, the length and width measurements may differ from your ruler measurements using the same method.
There are several factors that may impact TA's automated analysis of tissue composition. In general, TA's analysis of tissue composition is meant to serve as a guide for clinicians to see the color composition of the wound bed. It does not attribute tissue types to each region of the wound. The most significant source of color misclassification will arise when the image is too dark or too bright.
REPORTS
Reports are run by TA and emailed to you upon request. If you know the email address of your Program Manager, you can contact them directly and asked to be added to the reporting cycle. If you do not know your PM, please contact TA tech support and they will forward the inquiry to the appropriate person.
Login to the web portal and locate the image that you'd like to download. In the bottom left corner of the image there is a “save” icon. Click on the icon to download the image.
USER ACCESS
Please contact Tissue Analytics technical support for assistance with login issues, including unlocking your account after too many password attempts.
To give additional users access to the mobile app, you must be assigned Admin status in Tissue Analytics. If you are an admin, login to the web portal. Click Admin in the menu bar at the top of the page to access the admin page. Click on the User Accounts tab and then the Create New User button. Enter the information requested for the user on the Create Account form. You must use a unique email address for each user. Once you save the information, the user will be notified via email. If you are not an Admin, please contact Tissue Analytics technical support to request that users are added.
DEVICES AND HARDWARE
Place the green dot on (or as close as possible to) the same plane as the wound. The entire green dot must be visible in the photo. Many users find it helpful to place the dot towards the head of the patient to appropriately orient their photo capture. If you are using a ruler please place the ruler in the plane of the wound and make sure the cm markings are clearly visible.
TA is compatible with Android 5.0 or higher and iOS 10.3 or higher. We also have a responsive web application you can use on non-Android/iOS devices. However, due to the vast array of mobile devices available, it is possible yours is not compatible with the TA app. If this is the case, please contact a TA representative for more options.
CONNECTIVITY
Currently, you must be online to use the Tissue Analytics app.


